> ## Documentation Index
> Fetch the complete documentation index at: https://docs.aptlystar.ai/llms.txt
> Use this file to discover all available pages before exploring further.
# Settings
Properly configuring your agent is essential for accuracy, performance, and reliability. The **Settings** section lets you manage prompts, models, query behavior, and search precision.
***
## Settings Navigation
Set Chat & Embedding Models
Prompt Types & Prompt Library
Adjust Agent Temperature
Define Starter Prompts
Pass Contextual Inputs to Agent
Fine-Tune Result Relevance
***
## Agent Settings: Part 1
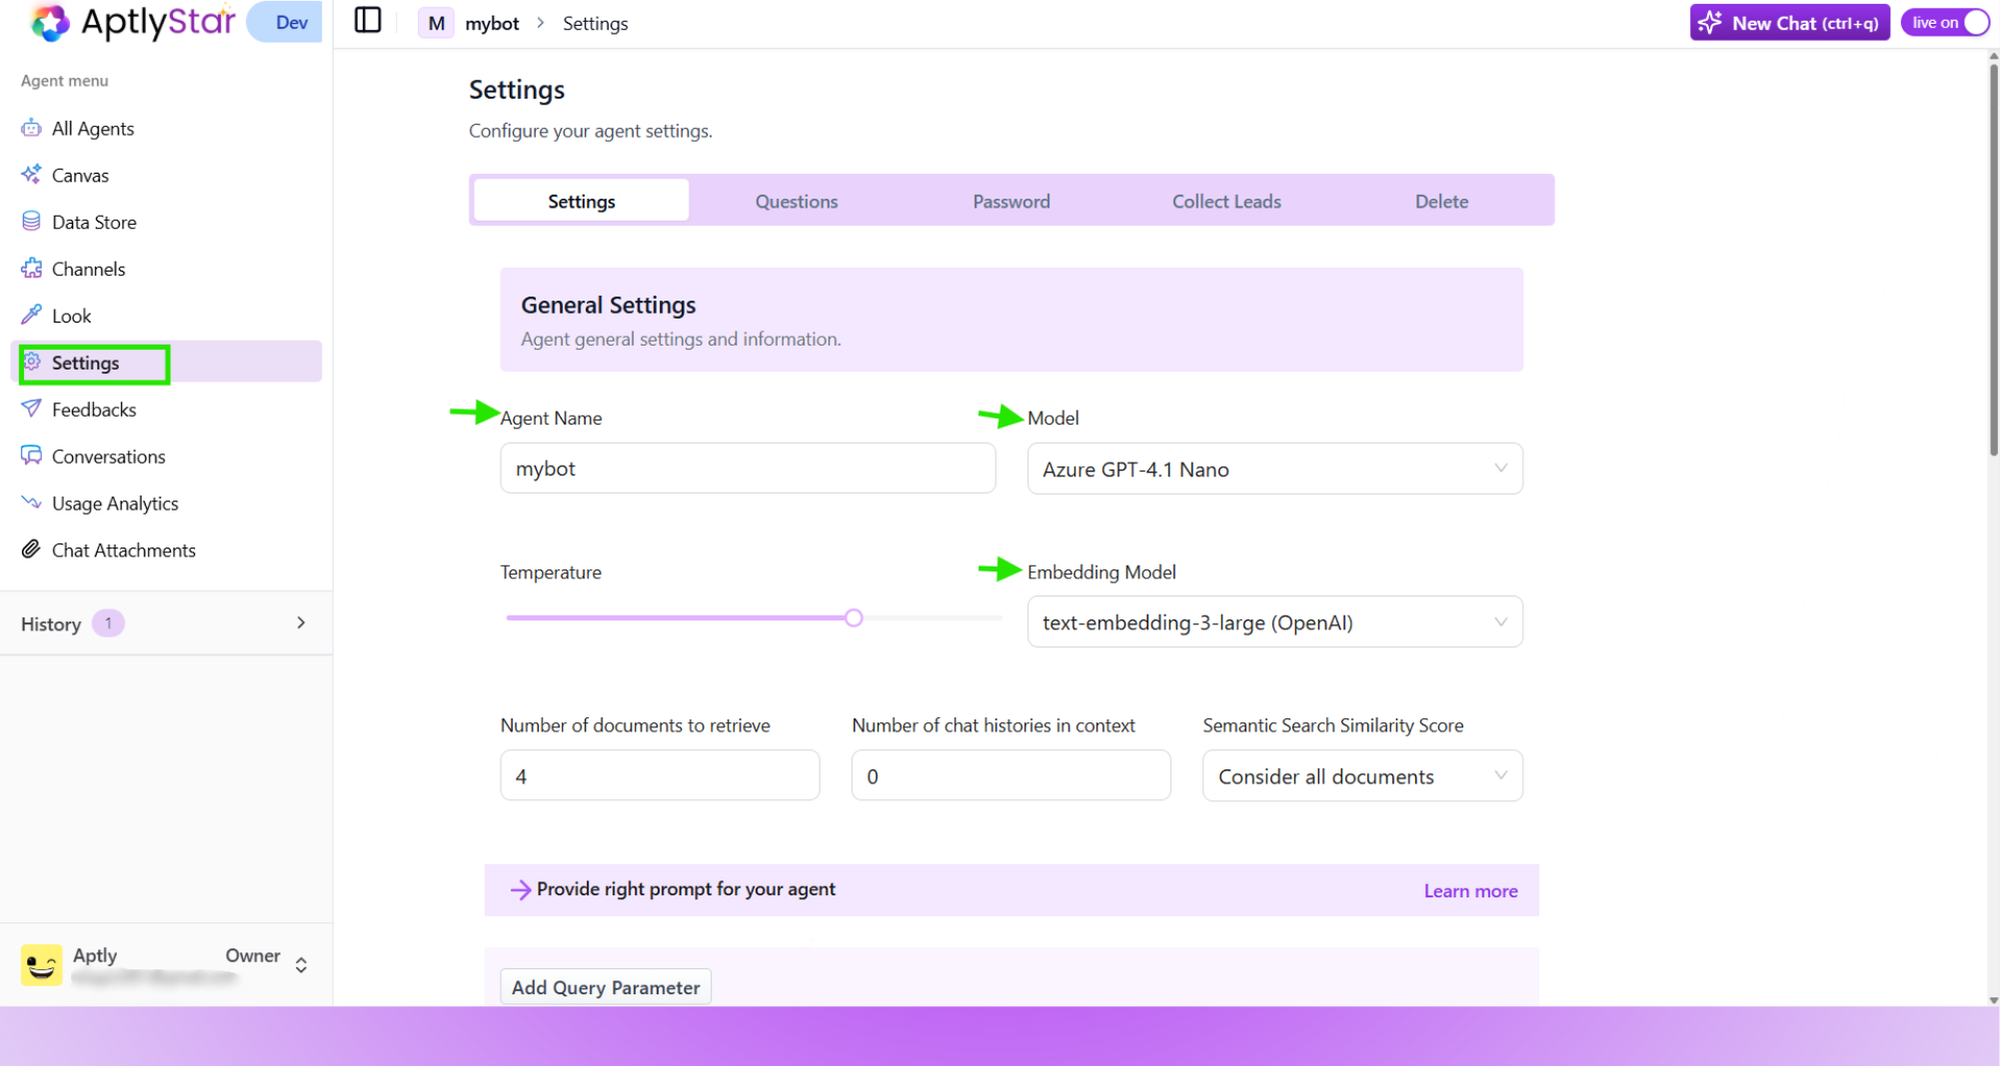
Configure the base models for your agent.
* Navigate to **Agent Settings**
* Update the **Agent name** (if needed)
* Choose your **Chat model**
* Select an **Embedding model**
* Save the settings
 ***
## Agent Settings: Part 2 – Prompts & Library
### ✅ Configure Prompt Behavior
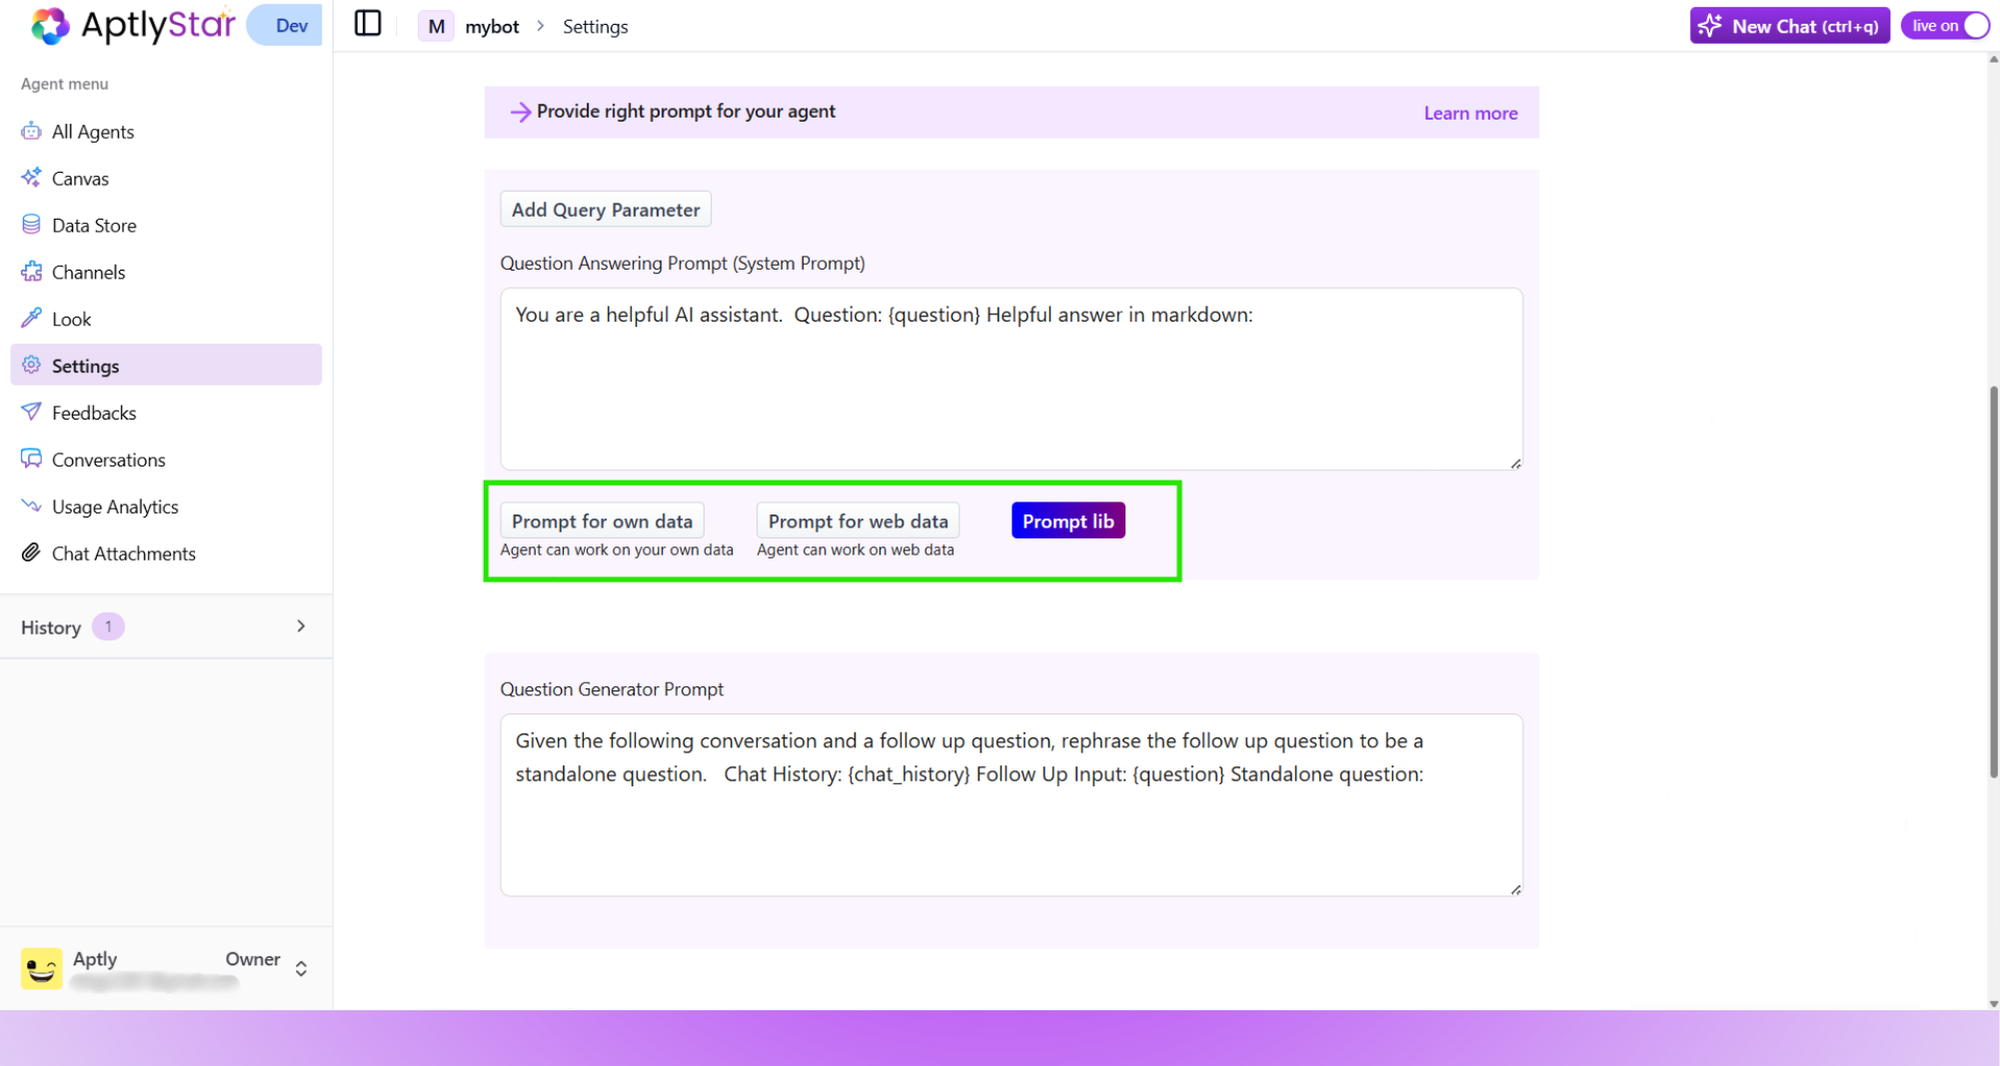
* **Prompt for Own Data**: Agent only responds using provided data. No hallucinations — replies with *“I don’t know”* if unsure.
* **Prompt for Web Data**: Good for standalone, follow-up questions without context.
* **Prompt Library**: Use system-defined prompts for use cases like Interviewer, Educator, or Assistant.
***
## Agent Settings: Part 2 – Prompts & Library
### ✅ Configure Prompt Behavior
* **Prompt for Own Data**: Agent only responds using provided data. No hallucinations — replies with *“I don’t know”* if unsure.
* **Prompt for Web Data**: Good for standalone, follow-up questions without context.
* **Prompt Library**: Use system-defined prompts for use cases like Interviewer, Educator, or Assistant.
 Let’s now look at how to explore and apply these predefined prompts.
***
### Using the Prompt Library
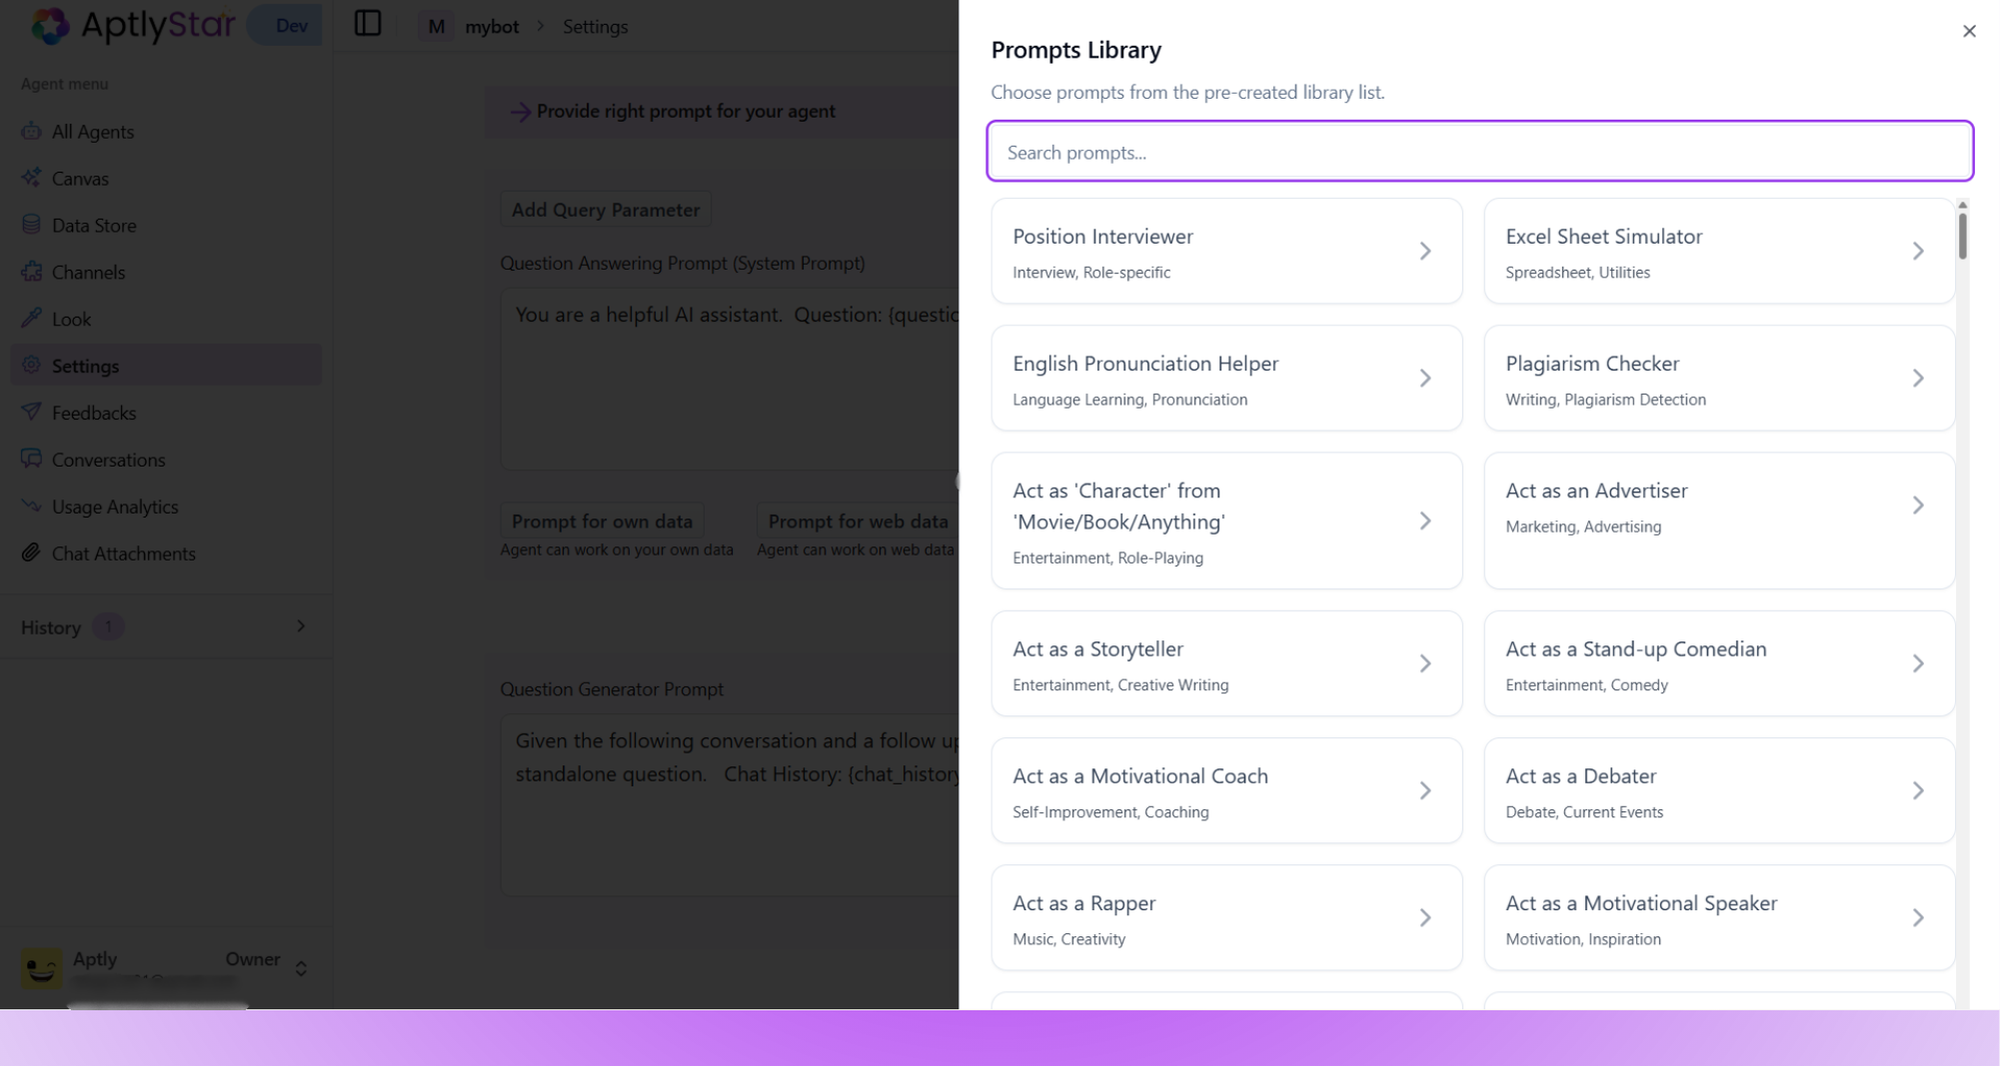
Click **Prompt lib** to access the built-in library of system prompts.\
Select a category that matches your agent's purpose — e.g., Position Interviewer, Storyteller, FAQ Agent.
Let’s now look at how to explore and apply these predefined prompts.
***
### Using the Prompt Library
Click **Prompt lib** to access the built-in library of system prompts.\
Select a category that matches your agent's purpose — e.g., Position Interviewer, Storyteller, FAQ Agent.
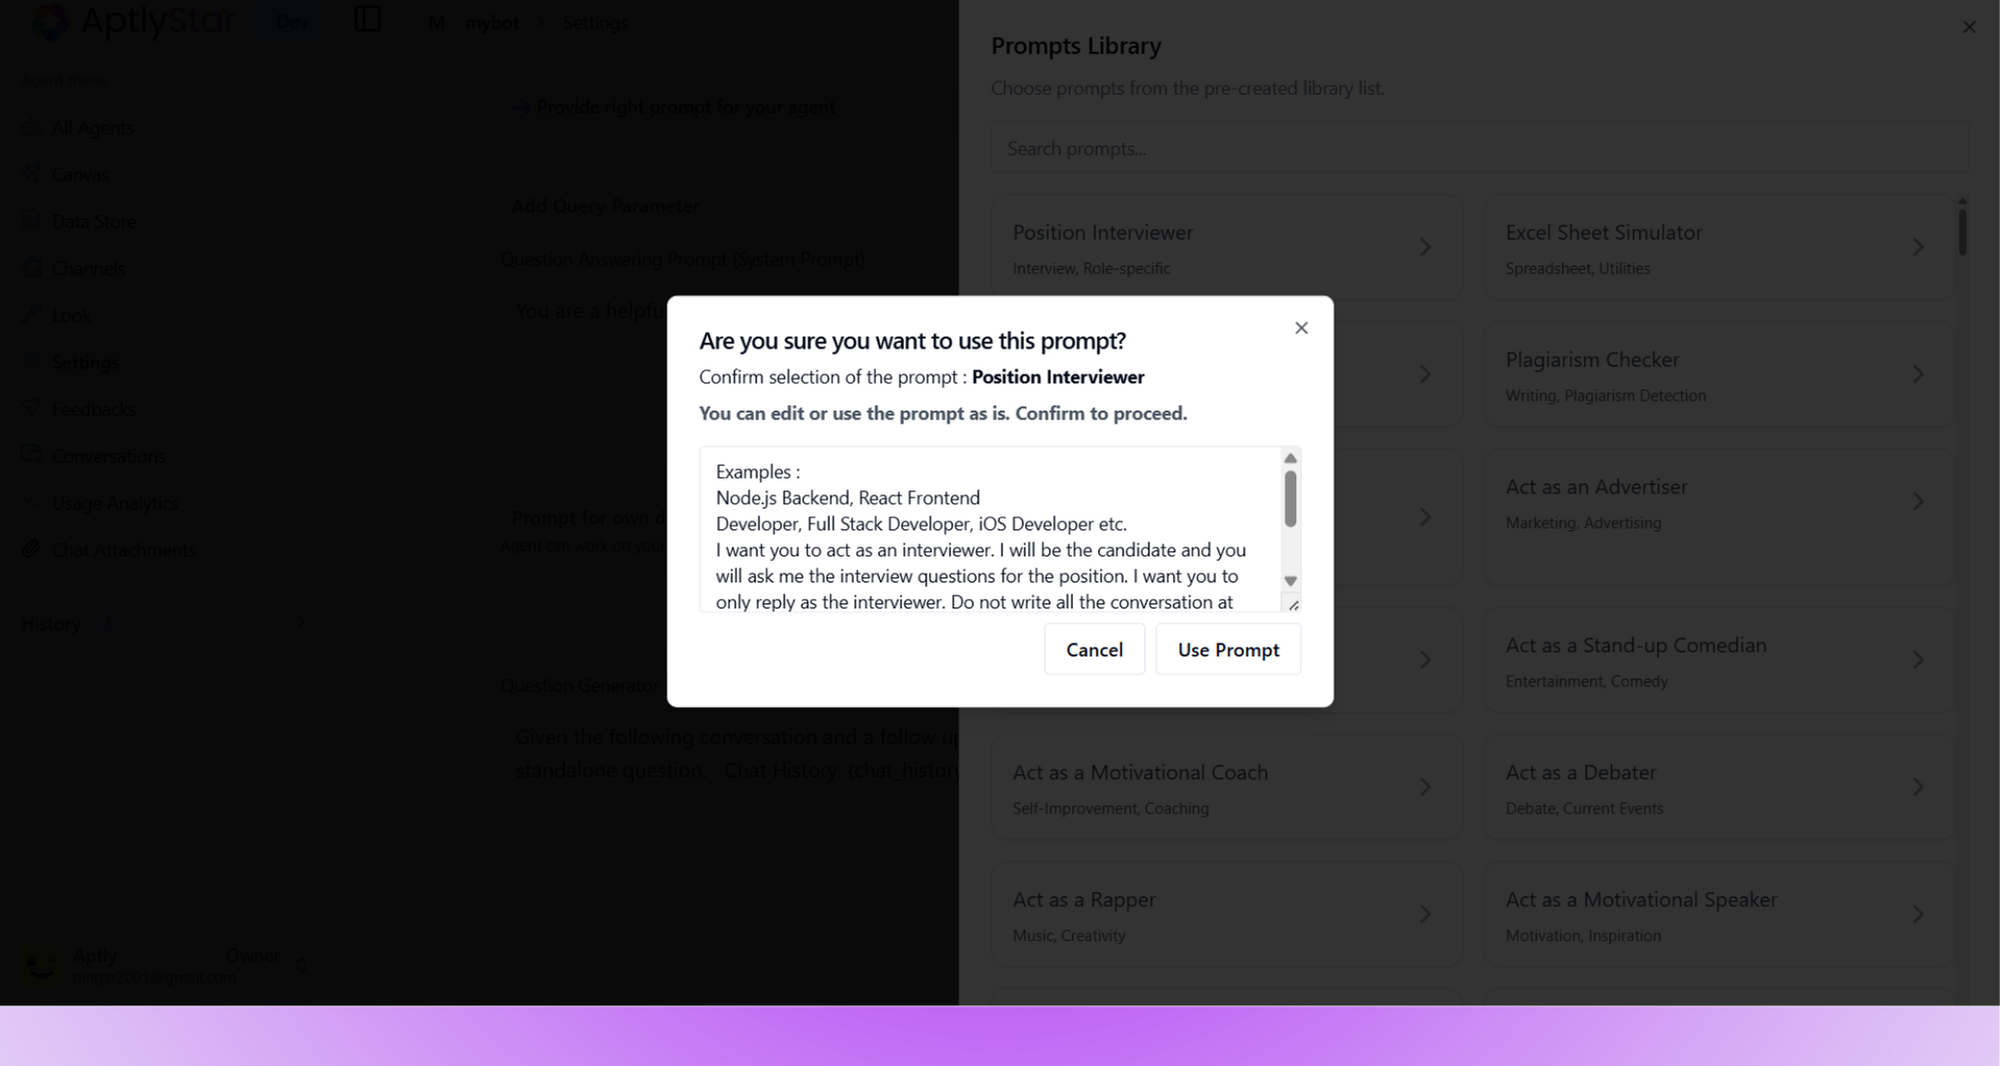
 After selecting a prompt, preview its description and sample usage.\
Click **Use Prompt** to confirm and apply it to your agent.
After selecting a prompt, preview its description and sample usage.\
Click **Use Prompt** to confirm and apply it to your agent.
 ***
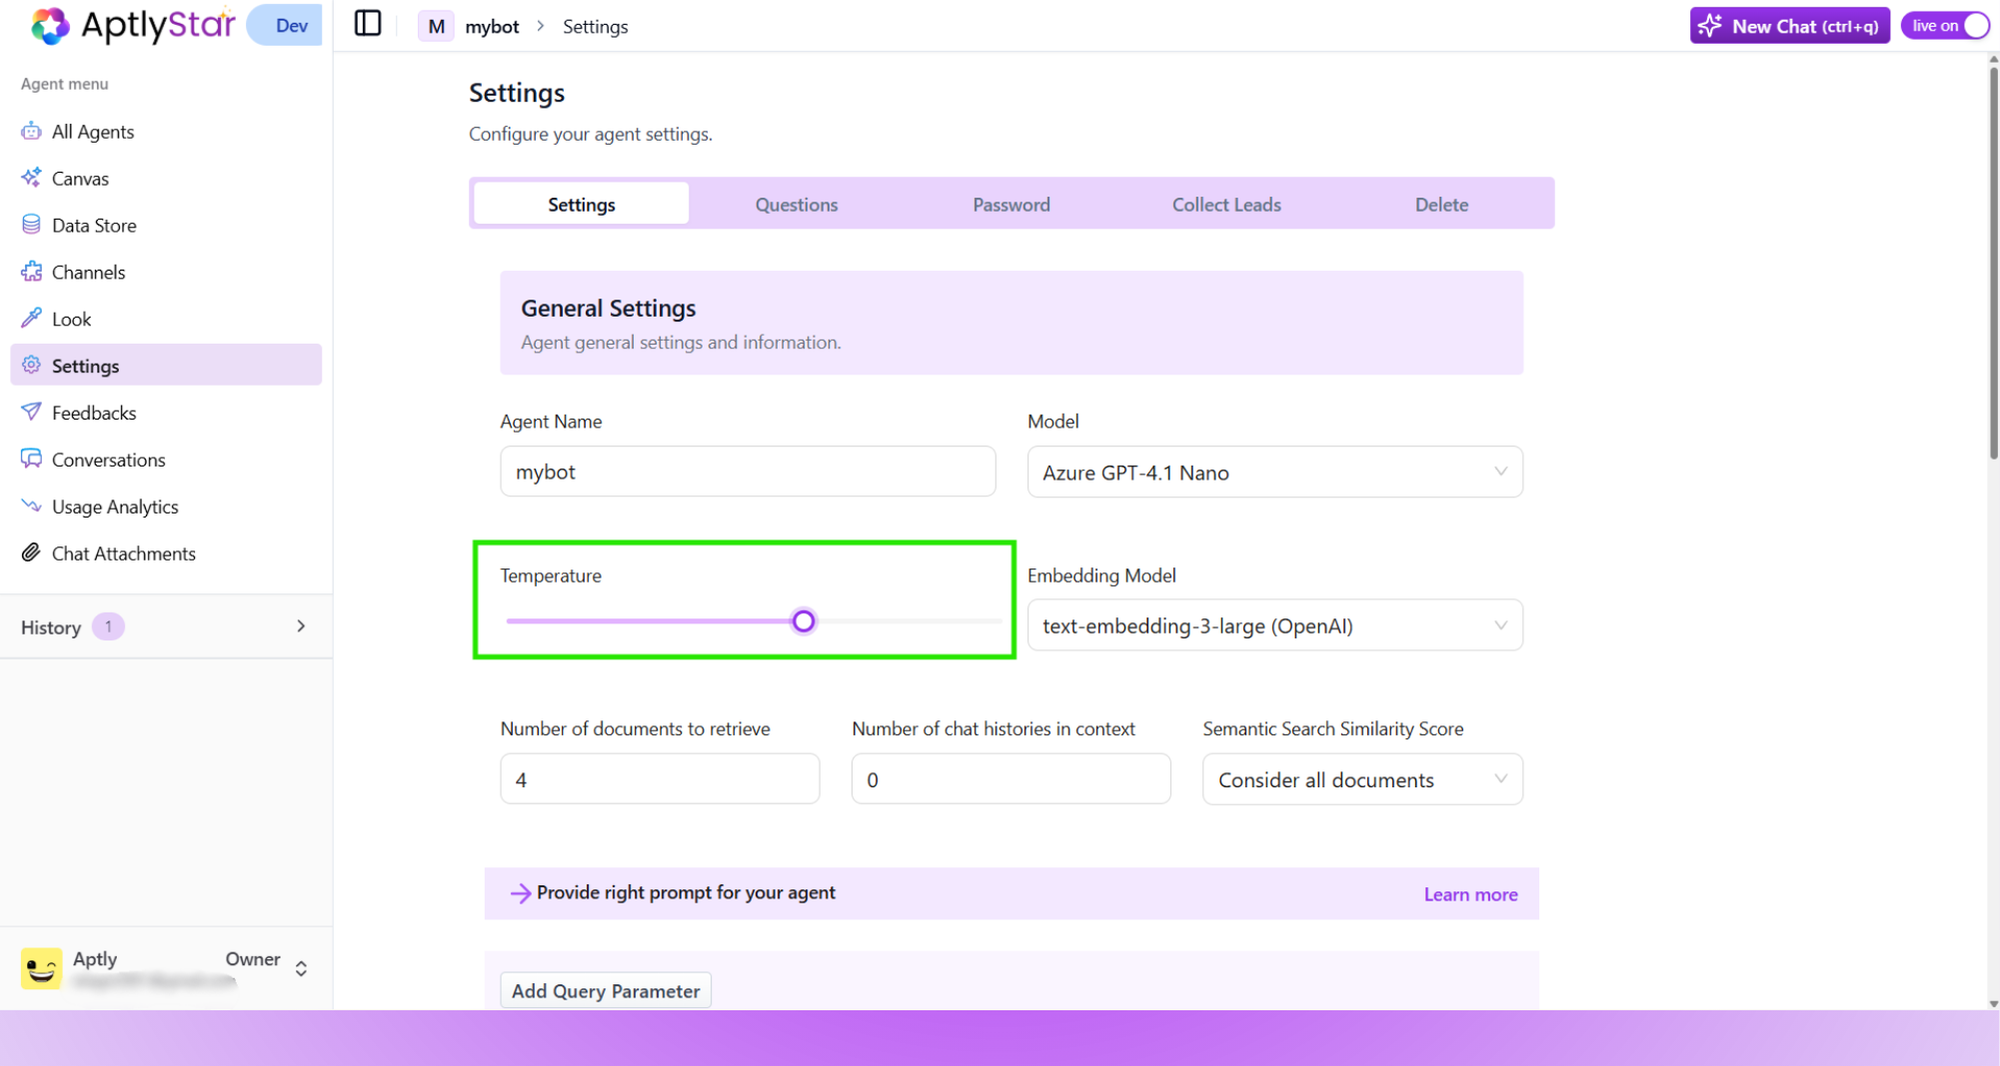
## Agent Settings: Part 3 - Temperature
Control the creativity or precision of your agent responses:
* `0.0 – 0.3`: Very accurate and focused
* `0.4 – 0.7`: Balanced response generation
* `0.8 – 1.0`: More imaginative and open-ended
***
## Agent Settings: Part 3 - Temperature
Control the creativity or precision of your agent responses:
* `0.0 – 0.3`: Very accurate and focused
* `0.4 – 0.7`: Balanced response generation
* `0.8 – 1.0`: More imaginative and open-ended
 ***
## Starter Questions
Let users quickly start conversations with predefined questions.
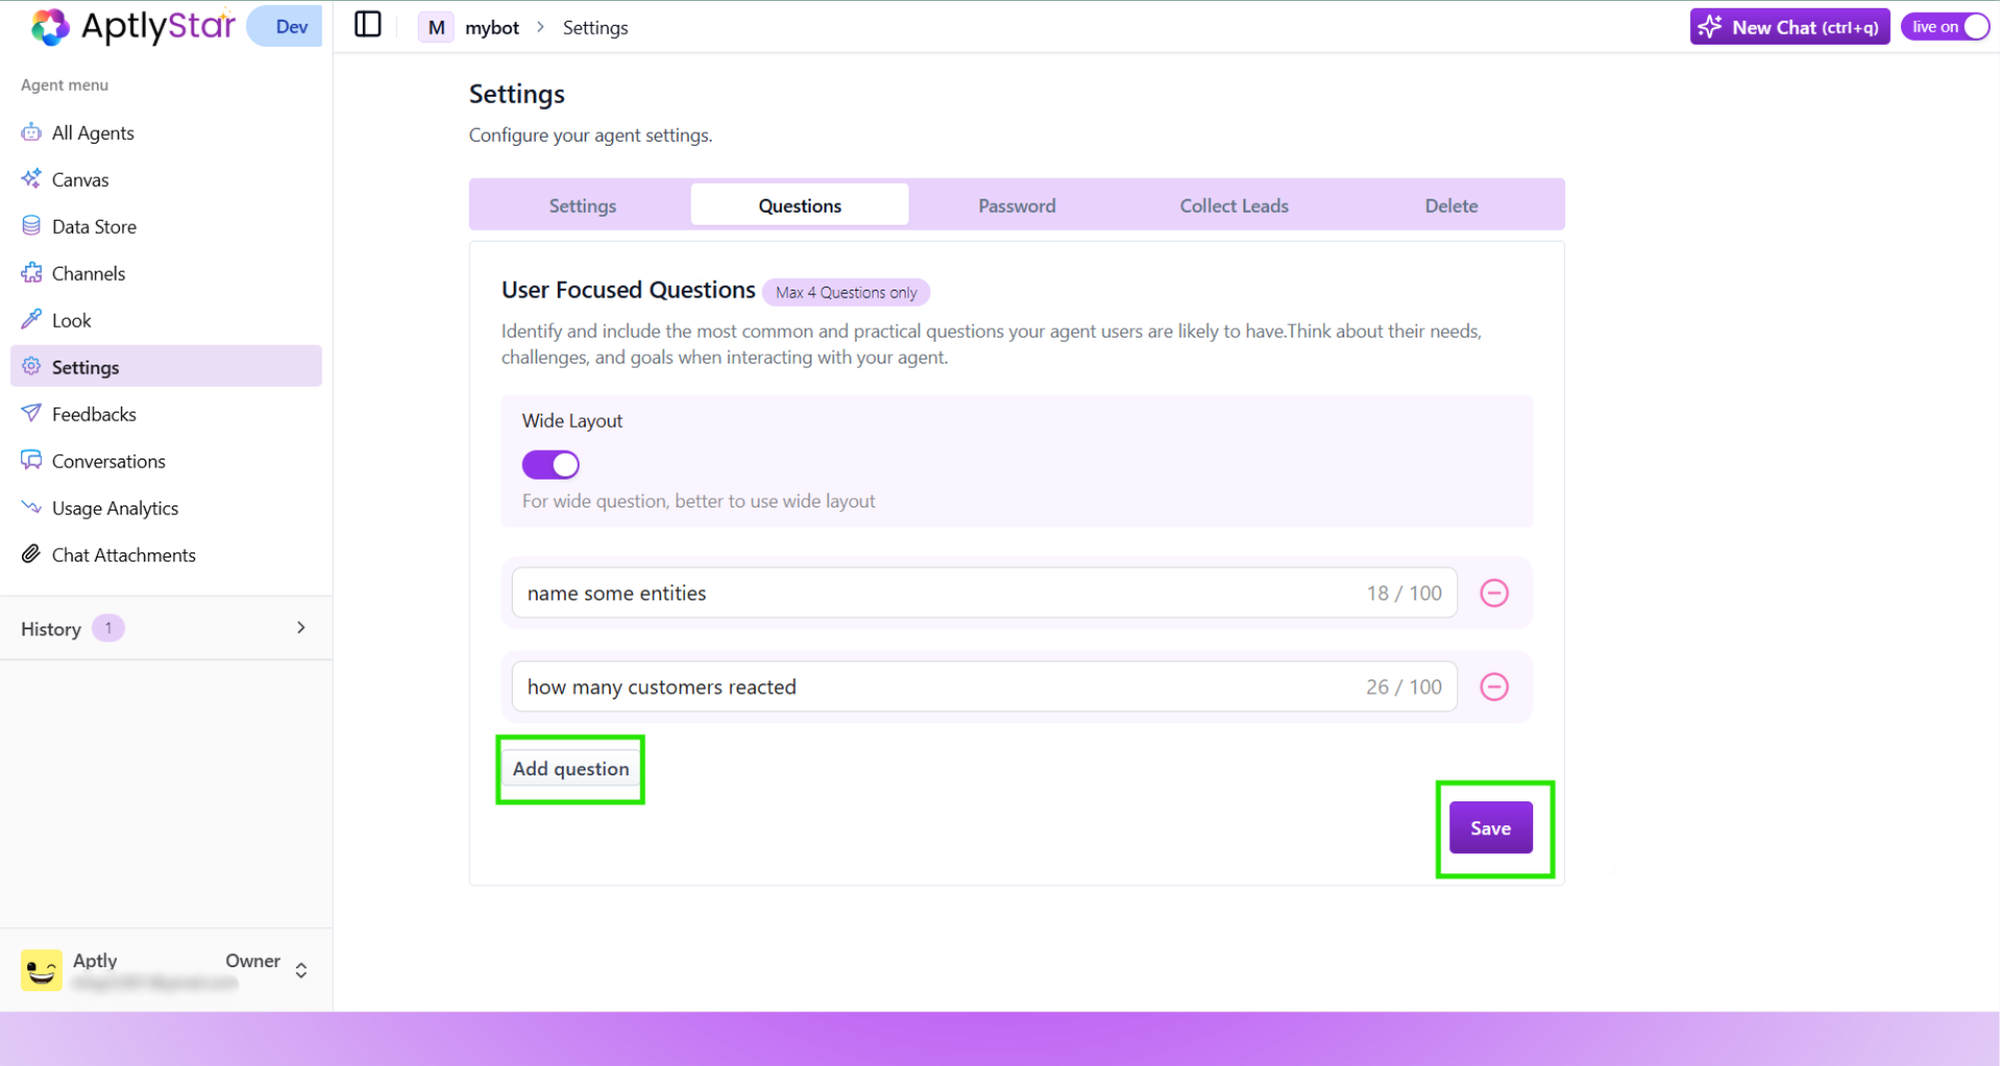
### How to Add Starter Questions
* Go to **Agent Settings → Starter Questions**
* Add up to 4 questions relevant to your agent
* Click **Add** and then **Save**
***
## Starter Questions
Let users quickly start conversations with predefined questions.
### How to Add Starter Questions
* Go to **Agent Settings → Starter Questions**
* Add up to 4 questions relevant to your agent
* Click **Add** and then **Save**
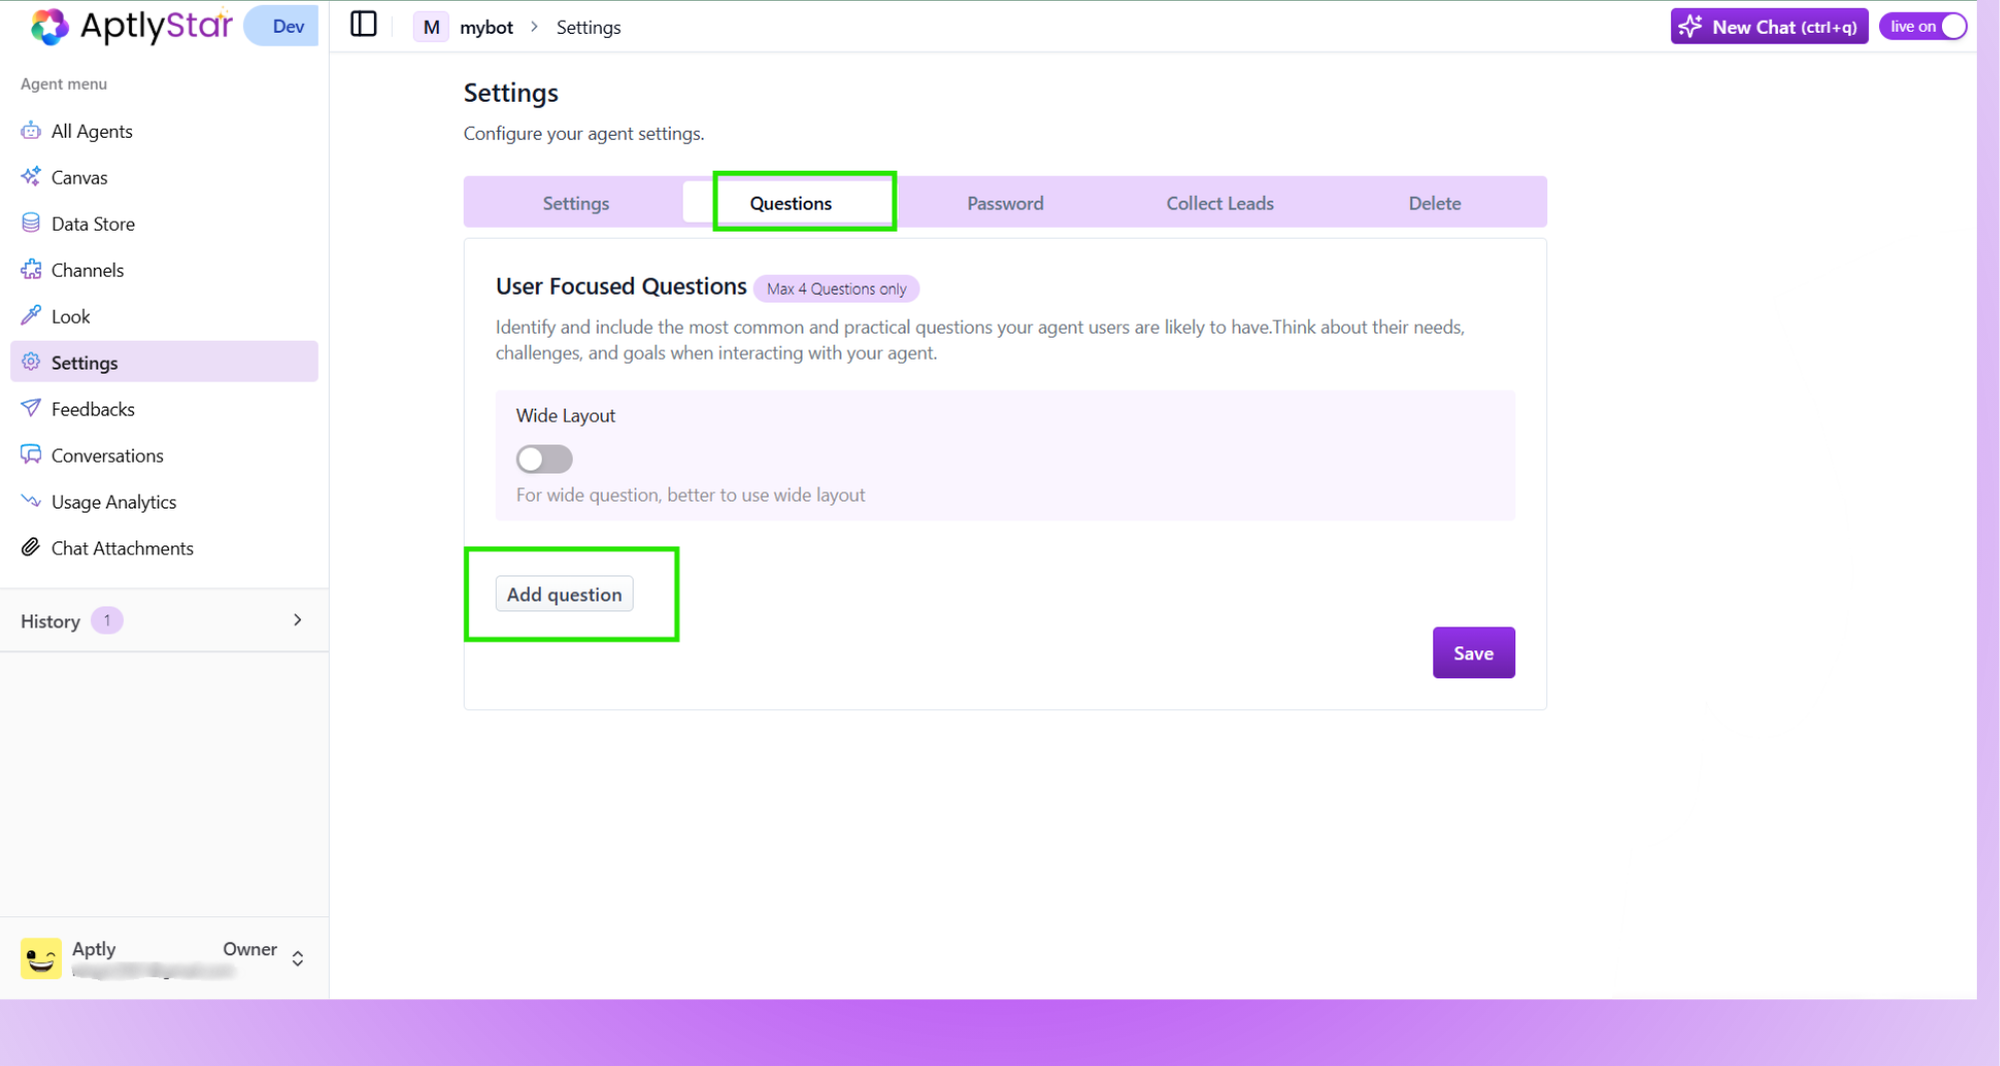 Add up to 4 questions relevant to your agent:
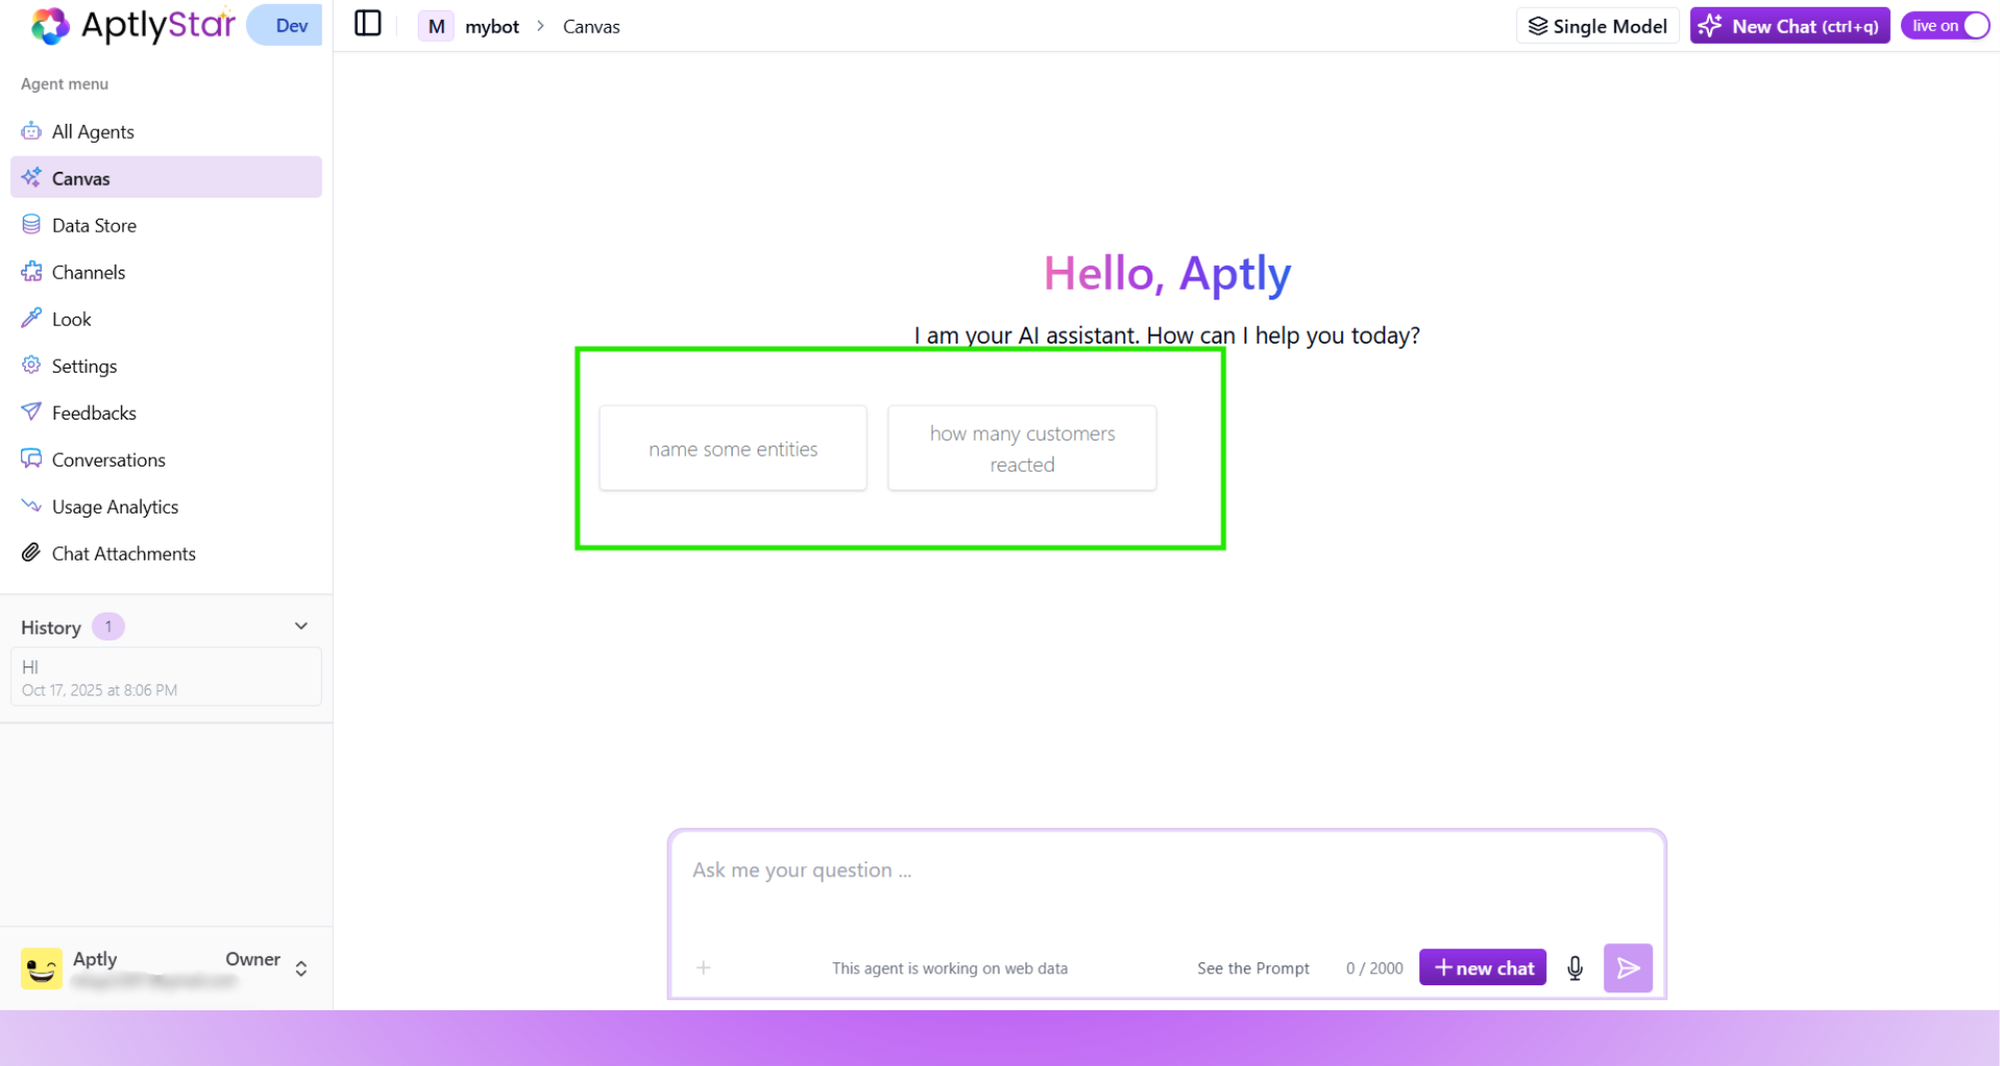
 To preview how your saved starter questions look in your console and user experience:
 ***
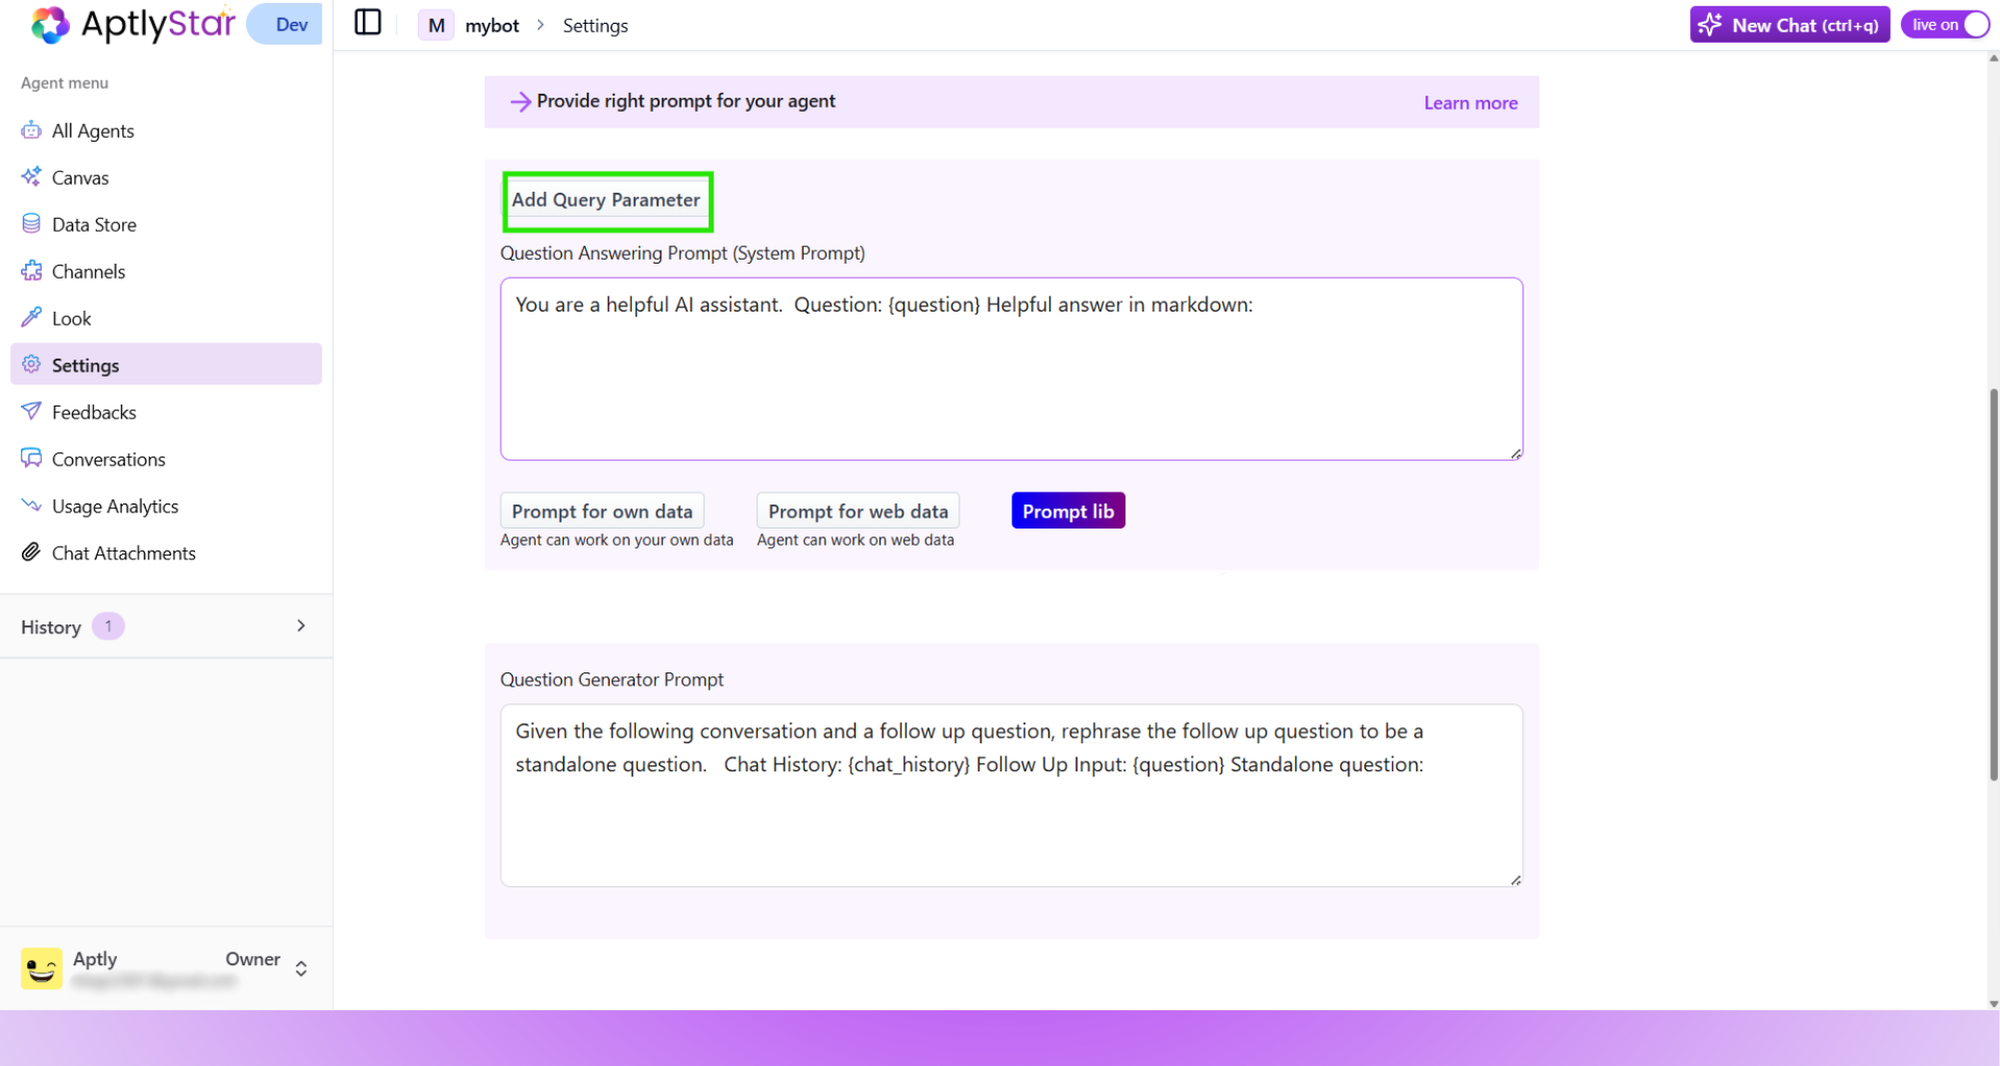
## Query Parameters
Query parameters allow you to inject dynamic data — like user ID, department, or context — directly into your agent’s logic.
### How to Add Query Parameters
* Go to **Agent Settings**
* Click **Add Query Parameter**
* Provide a name and reference in your prompt
* Save the changes
***
## Query Parameters
Query parameters allow you to inject dynamic data — like user ID, department, or context — directly into your agent’s logic.
### How to Add Query Parameters
* Go to **Agent Settings**
* Click **Add Query Parameter**
* Provide a name and reference in your prompt
* Save the changes
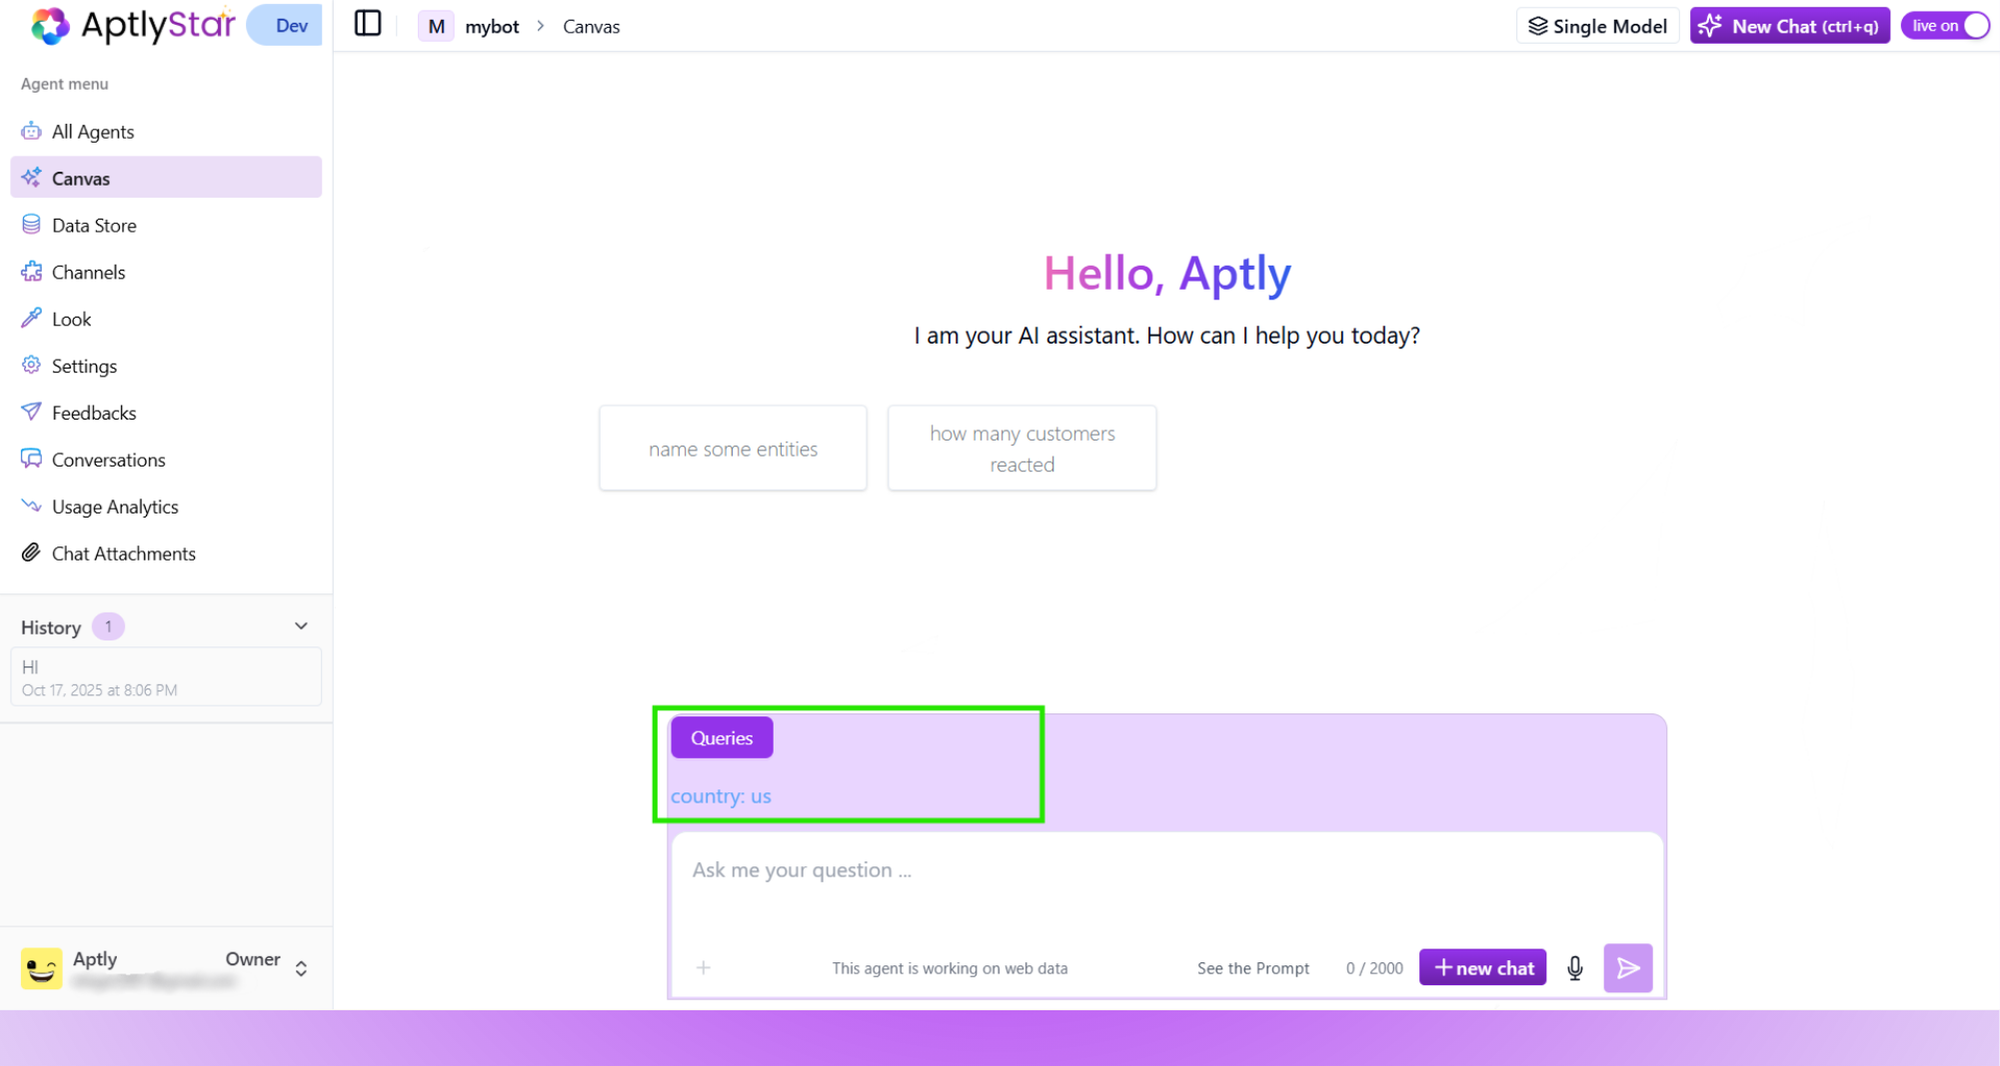
 Then, test the parameter live in the Playground UI:
 ***
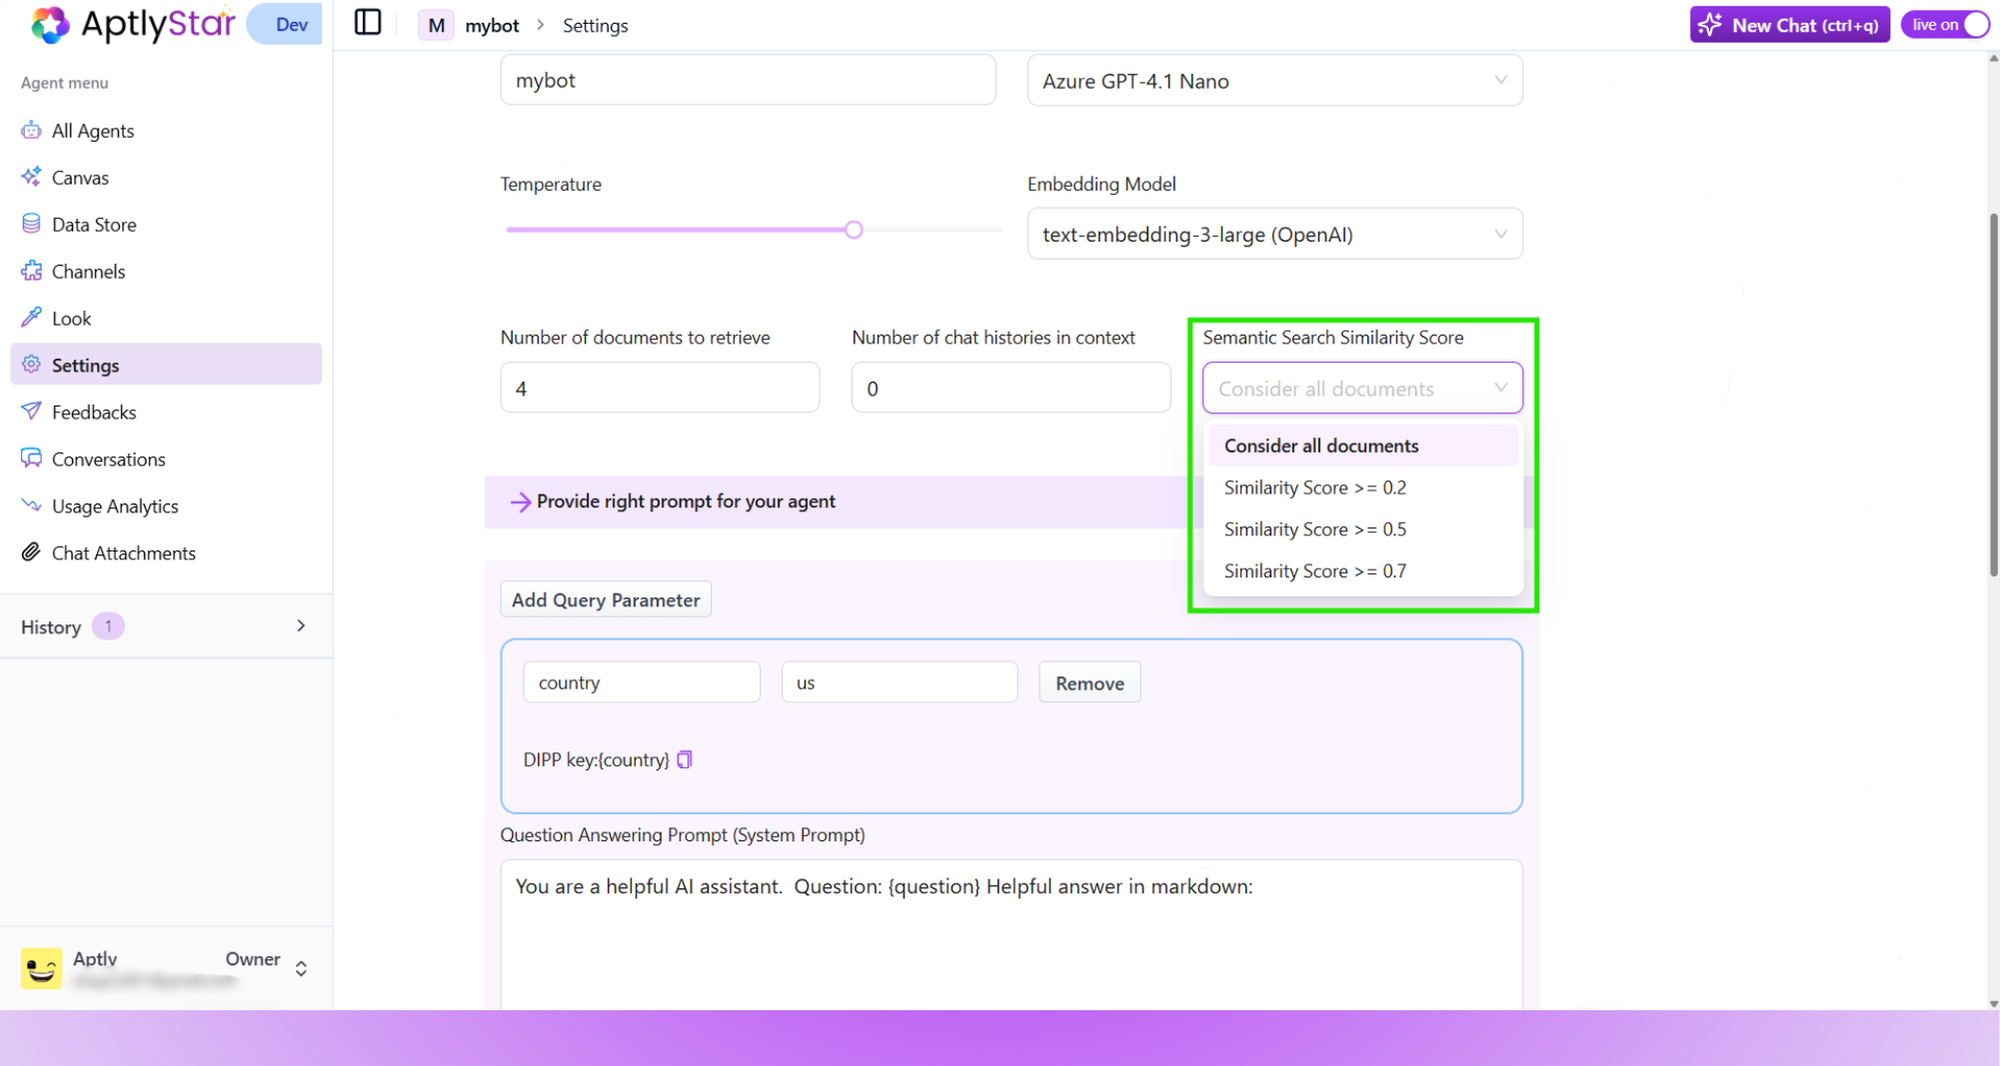
## 🎯 Semantic Search Similarity
Control how precisely the agent matches your knowledge base.
### Relevance Thresholds
* `≥ 0.2`: Broad, flexible match
* `≥ 0.5`: Moderate contextual relevance
* `≥ 0.7`: Strict precision
Change it under **Agent Settings** with a simple dropdown.
***
## 🎯 Semantic Search Similarity
Control how precisely the agent matches your knowledge base.
### Relevance Thresholds
* `≥ 0.2`: Broad, flexible match
* `≥ 0.5`: Moderate contextual relevance
* `≥ 0.7`: Strict precision
Change it under **Agent Settings** with a simple dropdown.
 ***
## 📩 Lead Collection
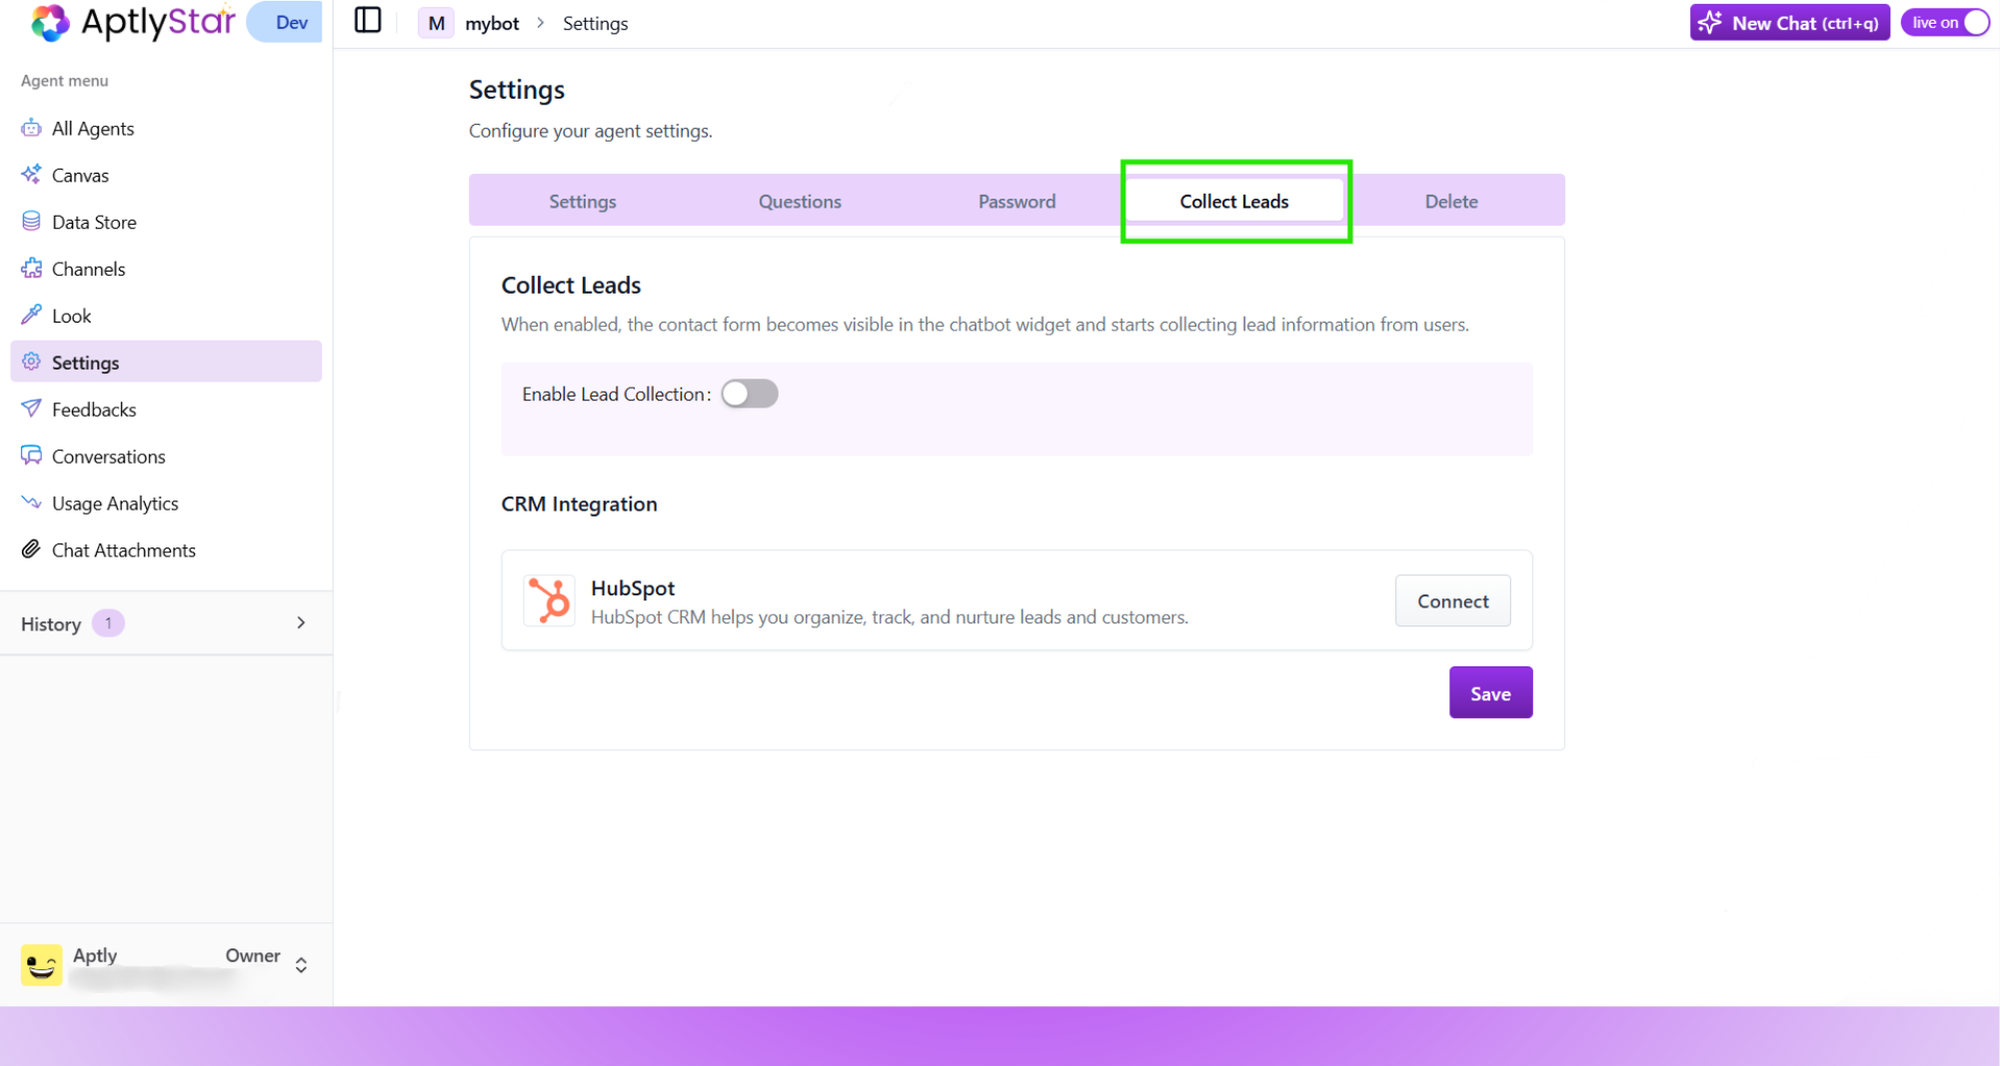
You can now enable lead collection directly from the **Settings** panel.
### How it Works
* When **Enable Lead Collection** is turned on, a contact form will be shown inside the agent widget.
* This form gathers user information like name, email, and optional notes.
* It helps convert casual visitors into potential leads or customers.
***
## 📩 Lead Collection
You can now enable lead collection directly from the **Settings** panel.
### How it Works
* When **Enable Lead Collection** is turned on, a contact form will be shown inside the agent widget.
* This form gathers user information like name, email, and optional notes.
* It helps convert casual visitors into potential leads or customers.
 Lead collection is a powerful way to capture qualified interest and convert chat interactions into actionable sales or support opportunities.
For more details about CRM integration and how collected leads sync with **HubSpot**, visit the [Lead Collection page](/ai-bots-console/leads).
Configure these settings thoughtfully to ensure your agent delivers helpful, relevant, and contextually aware responses every time.
Lead collection is a powerful way to capture qualified interest and convert chat interactions into actionable sales or support opportunities.
For more details about CRM integration and how collected leads sync with **HubSpot**, visit the [Lead Collection page](/ai-bots-console/leads).
Configure these settings thoughtfully to ensure your agent delivers helpful, relevant, and contextually aware responses every time.